在本专栏的上一篇blog里,我们学会了搭建第一个Android的项目的过程,应该非常简单,那么这篇blog我们将在上个项目基础上,做些修改,同时来学习下Android的用户界面布局基础。
安卓的用户界面布局,是采用嵌套的View和ViewGroup这两个对象来进行布局设计的。View对象表示按钮,文本框,单选按钮...能看到的那些组件,ViewGroup对象则是不可见的,仅仅是一个组件的容器,它可以用来定义组件如何放置,比如放到表格里或者放到垂直的一个列表里。如果不清楚的话,可以看下图进行理解:
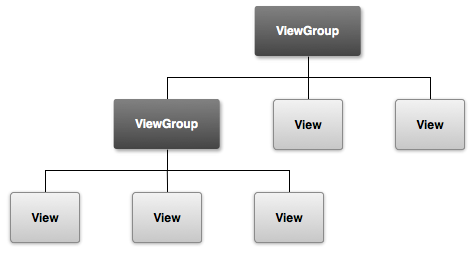
Android提供了一个XML用来定义这些View和ViewGroup。在下面的介绍里,我们将会学习在界面放置一个按钮以及一个文本框,通过点击按钮发送文本框的内容到另外一个界面。
首先打开res/layout/目录里的activity_main.xml文件。
默认情况下的app是给我们提供了一个RelativeLayout的布局,以及一个文本框TextView,我们对此进行下修改:
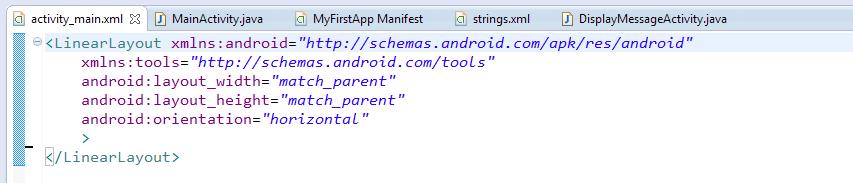
删除TextView元素,并且将RelativeLayout元素更改为LinearLayout元素,然后在LinearLayout里面添加android:orientation属性,编辑完之后,应该是这样的:
<LinearLayout xmlns:android="http://schemas.android.com/apk/res/android"
    xmlns:tools="http://schemas.android.com/tools"
    android:layout_width="match_parent"
    android:layout_height="match_parent"
    android:orientation="horizontal"
    >
</LinearLayout>
上面代码中的LinearLayout即是一个ViewGroup,定义了一个线性布局
android:orientation属性则定义了这个LinearLayout内部的View如何放置,是水平布局还是垂直布局,我们这里设置的为水平布局
android:layout_width 和 android:layout_height定义了内部组件的的宽高,match_parent意思是和父类一样。
更多的布局,可以参考这个地方的讲解:
http://developer.android.com/guide/topics/ui/declaring-layout.html
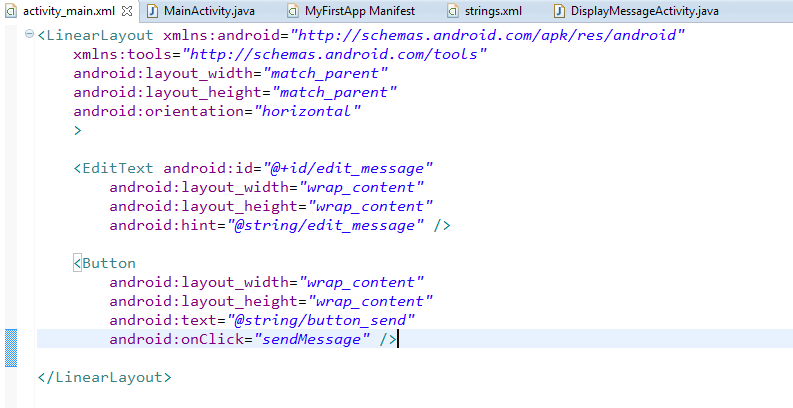
定义了一个水平的线性布局后,我们可以向内添加一些View,下面我们添加一个文本框以及一个按钮,如下所示:
<LinearLayout xmlns:android="http://schemas.android.com/apk/res/android"
    xmlns:tools="http://schemas.android.com/tools"
    android:layout_width="match_parent"
    android:layout_height="match_parent"
    android:orientation="horizontal"
    >

    <EditText android:id="@+id/edit_message"
        android:layout_width="wrap_content"
        android:layout_height="wrap_content"
        android:hint="@string/edit_message" />

    <Button
        android:layout_width="wrap_content"
        android:layout_height="wrap_content"
        android:text="@string/button_send"
        android:onClick="sendMessage" />

</LinearLayout>
为了增加一个文本框,在Android里用EditText标签来添加一个文本框,如果添加一个按钮则是Button来添加,每个标签内部的属性如下:
id是view唯一的属性,也就是说当前组件的唯一身份标示。@意思指的是当前内容需要参考某个XML文件。
“+”表示你需要为当前组件添加一个id,这个id将会在gen/R.java里生成,用来指代对应的组件。
android:layout_width and android:layout_height:
表示元件的宽高设置,如果是“wrap_content”,指的是根据内容自动调整,如果是“match_parent”,则表示与父级元素相等。
当组件没有定义显示内容的时候,android:hint的内容将会做为默认的显示内容。
设置好上述代码后,我们遍设置好了界面,我们还需要把组件显示的内容保存到一个资源文件里,专门用来显示,这个文件便是:res/values/strings.xml.我们照猫画虎,添加如下内容:
<?xml version="1.0" encoding="utf-8"?>
<resources>

    <string name="app_name">My First App</string>
    <string name="edit_message">Enter a message</string>
    <string name="button_send">Send</string>
    <string name="action_settings">Settings</string>
    <string name="title_activity_main">MainActivity</string>
    <string name="title_activity_display_message">My Message</string>
    <string name="hello_world">Hello world!</string>

</resources>
这个时候再回头看layout文件,比如:
android:text="@string/button_send"
上面代码意思就是:显示文本,内容为string.xml里的name=button_send的属性值,那么就是“Send”了。
这个时候我们运行下该app,便可以看到刚才我们设置好的布局了。
文章的脚注信息由WordPress的wp-posturl插件自动生成

 微信扫一扫,打赏作者吧~
![[整理]Android按键点击处理的4种方法](http://www.jyguagua.com/wp-content/themes/begin/img/random/7.jpg)
![[已解决]win7 64位 CDC驱动无法安装 USB Dongle CDC驱动无法安装](http://www.jyguagua.com/wp-content/themes/begin/timthumb.php?src=http://www.jyguagua.com/wp-content/uploads/2015/05/pic_thumb.jpg&w=280&h=210&zc=1)
![[分享]新入手moto 360后的一些资料参考](http://www.jyguagua.com/wp-content/themes/begin/img/random/13.jpg)
![[分享]Samsung Galaxy Note3 USB驱动](http://www.jyguagua.com/wp-content/themes/begin/img/random/17.jpg)