在CentOS搭建wordpress之前,我们需要具备LNMP环境(Linux,Nginx,Mysql,PHP)
在搭建环境之前,我们先创建一个普通用户用来构建环境。
生产环境切记不用root用户。
创建好用户之后,开始安装相关软件,走起~
第一步:安装相关的软件仓库
我们将使用Yum安装所有必需的软件。但是,由于nginx不能直接从CentOS获得,我们需要安装epel源。
sudo yum install epel-release
第二步:安装MySQL
安装Mysql:
sudo yum install mysql-server
安装完成之后,重启一次MySQL:
sudo /etc/init.d/mysqld restart
命令窗口会提示:
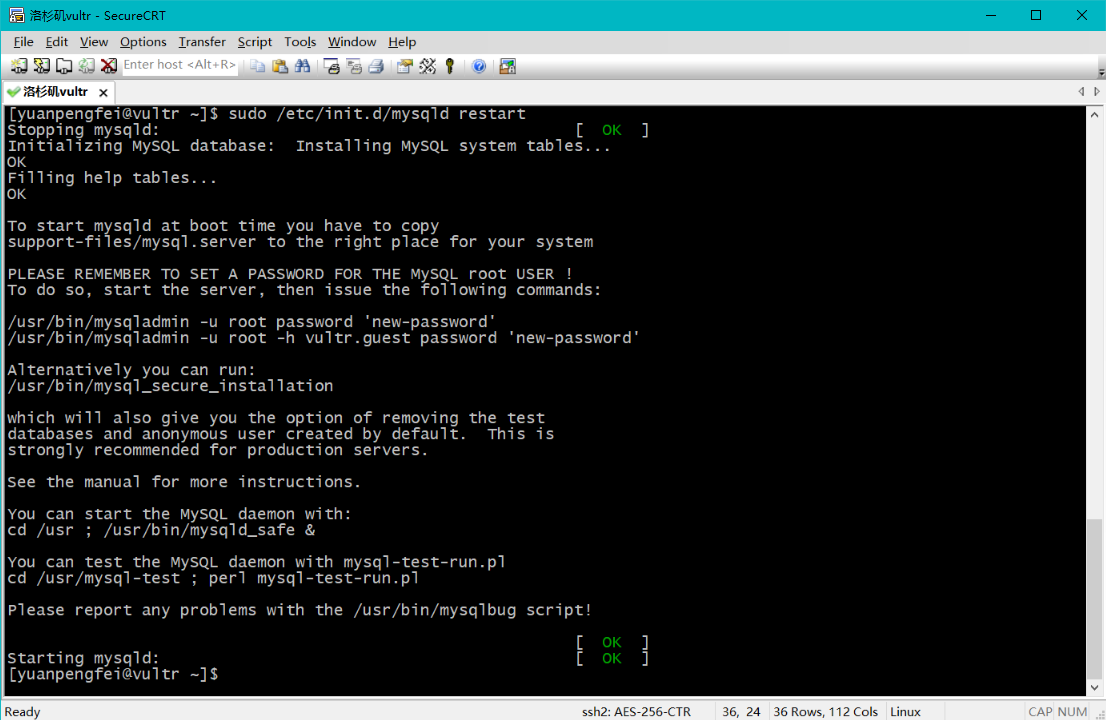
我们需要使用以下命令对MySQL进行一些配置:
sudo /usr/bin/mysql_secure_installation
下面是配置的过程:
由于我们是新安装的MySQL, root密码为空即可,直接输入回车.
Enter current password for root (enter for none):
OK, successfully used password, moving on...
然后弹窗会提示让你输入root密码,那么输入一个密码即可.
CentOS会继续配置一些内容,当然都比较简单的,按照提示即可.
我们只需要给出 yes 或者 no。最后,MySQL将应用我们所做的配置。
By default, a MySQL installation has an anonymous user, allowing anyone
to log into MySQL without having to have a user account created for
them.  This is intended only for testing, and to make the installation
go a bit smoother.  You should remove them before moving into a
production environment.

Remove anonymous users? [Y/n] y
 ... Success!

Normally, root should only be allowed to connect from 'localhost'.  This
ensures that someone cannot guess at the root password from the network.

Disallow root login remotely? [Y/n] y
... Success!

By default, MySQL comes with a database named 'test' that anyone can
access.  This is also intended only for testing, and should be removed
before moving into a production environment.

Remove test database and access to it? [Y/n] y
 - Dropping test database...
 ... Success!
 - Removing privileges on test database...
 ... Success!

Reloading the privilege tables will ensure that all changes made so far
will take effect immediately.

Reload privilege tables now? [Y/n] y
 ... Success!

Cleaning up...

All done!  If you've completed all of the above steps, your MySQL
installation should now be secure.

Thanks for using MySQL!
第三步:安装Nginx
sudo yum install nginx
默认Nginx服务第一次未启动,我们通过下面命令启动:
sudo /etc/init.d/nginx start
第四步:安装PHP
sudo yum install php-fpm php-mysql
第五步:配置PHP
sudo vi /etc/php.ini
找到行cgi.fix_pathinfo = 1,并将1更改为0
如果这个数字保持为1,php解释器将尽可能处理尽可能接近请求文件的文件。这是一个可能的安全风险。如果此数字设置为0,相反,解释器将仅处理确切的文件路径 - 一个更安全的选择。保存并退出。
第六步:配置Nginx
打开默认的nginx配置文件:
sudo vi /etc/nginx/nginx.conf
将工作进程的数量提高到4,然后保存并退出该文件。
现在我们应该配置nginx虚拟主机。
为了使默认的nginx文件更加简洁,虚拟主机的详细信息位于不同的位置。编辑虚拟主机配置文件:
sudo vi /etc/nginx/conf.d/default.conf
修改配置文件为如下内容:
#
# The default server
#
server {
    listen       80;
    server_name example.com;


    location / {
        root   /usr/share/nginx/html;
        index index.php  index.html index.htm;
    }

    error_page  404              /404.html;
    location = /404.html {
        root   /usr/share/nginx/html;
    }

    error_page   500 502 503 504  /50x.html;
    location = /50x.html {
        root   /usr/share/nginx/html;
    }

    # pass the PHP scripts to FastCGI server listening on 127.0.0.1:9000
    #
    location ~ \.php$ {
        root           /usr/share/nginx/html;
        fastcgi_pass   127.0.0.1:9000;
        fastcgi_index  index.php;
        fastcgi_param  SCRIPT_FILENAME   $document_root$fastcgi_script_name;
        include        fastcgi_params;
    }
}
上面的内容主要配置了:
- 默认首页index.php
- 将server_name更改为您的域名或IP地址(替换配置中的example.com)
- 修改网页的默认目录:/usr/share/nginx/html
- 更改fastcgi_param以帮助PHP解释器找到我们存储在网页目录中的PHP文件
下面我们配置php-fpm:
sudo vi /etc/php-fpm.d/www.conf
用nginx替换用户和组中的apache:
[...]
; Unix user/group of processes
; Note: The user is mandatory. If the group is not set, the default user's group
;	will be used.
; RPM: apache Choosed to be able to access some dir as httpd
user = nginx
; RPM: Keep a group allowed to write in log dir.
group = nginx
[...]
修改后重启php-fpm:
sudo service php-fpm restart
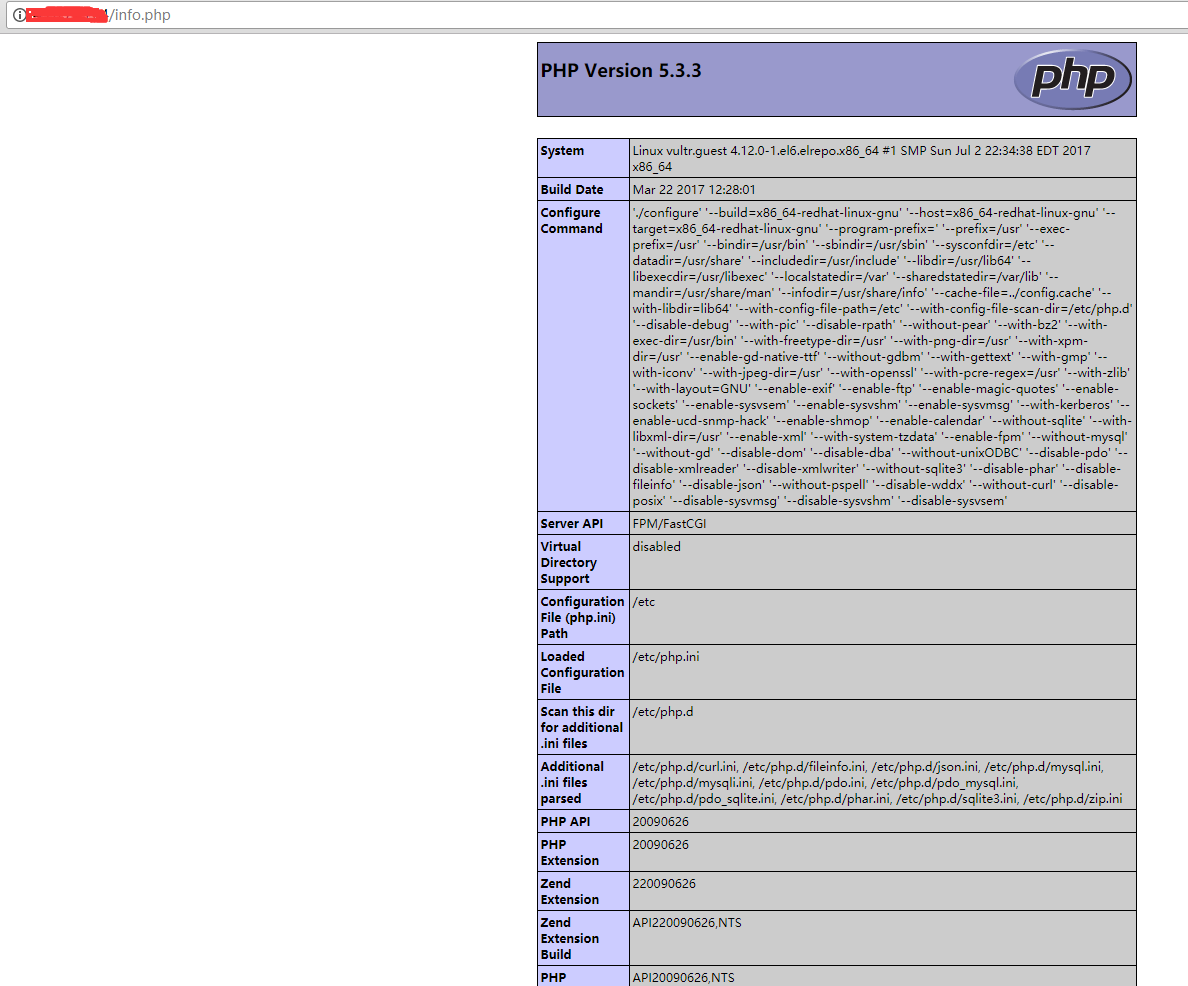
第七步:创建测试PHP页面
sudo vi /usr/share/nginx/html/info.php
info.php内容:
<?php
phpinfo();
?>
重启Nginx服务器:
sudo service nginx restart
然后访问您的php信息页面(确保您用正确的替换示例IP地址):http://xxx.xxx.xxx.xxx/info.php
这个时候应该就可以看到页面了:
第八步:设置服务开机自启动
sudo chkconfig --levels 235 mysqld on
sudo chkconfig --levels 235 nginx on
sudo chkconfig --levels 235 php-fpm on
截止到上步骤,我们已经完成了LNMP的环境搭建了,再安装wordpress其实都只是小菜一碟了。
下面开始wordpress的安装,走起~
第一步:下载wordpress
wget http://wordpress.org/latest.tar.gz
解压压缩包:
tar -xzvf latest.tar.gz
第二步:创建WP的数据库,数据库用户
我们通过命令行进行mysql的操作:
mysql -u root -p
CREATE DATABASE wordpress;
CREATE USER wordpressuser@localhost;
设置用户密码:
SET PASSWORD FOR wordpressuser@localhost= PASSWORD("password");
通过向新用户授予所有权限来完成。没有这个命令,wordpress安装程序将无法启动
GRANT ALL PRIVILEGES ON wordpress.* TO wordpressuser@localhost IDENTIFIED BY 'password';
更新上述所有配置,并且生效:
FLUSH PRIVILEGES;
然后退出MySQL命令终端:
exit
第三步:配置wordpress
cp ~/wordpress/wp-config-sample.php ~/wordpress/wp-config.php
然后打开wordpress配置文件:
sudo vim ~/wordpress/wp-config.php
查找包含以下字段的部分,并以正确的名称替换数据库,用户名和密码:
// ** MySQL settings - You can get this info from your web host ** //
/** WordPress 数据库名 */
define('DB_NAME', 'wordpress');

/** MySQL 数据库用户名 */
define('DB_USER', 'wordpressuser');

/** MySQL 数据库密码 */
define('DB_PASSWORD', 'password');
然后保存退出。
第四步:拷贝WP文件
我们将把Wordpress放到服务器/var/www/wordpress目录。我们需要创建我们将保留wordpress文件的目录:
sudo mkdir -p /var/www/wordpress
sudo cp -r ~/wordpress/* /var/www/wordpress
我们可以修改/ var / www的权限,以便将来可以使用SFTP自动更新Wordpress插件和文件编辑。如果不采取这些步骤,则可能会在尝试执行任务时获得“要执行所请求的操作,需要连接信息”错误消息。
首先,切换到web目录:
cd /var/www/
将目录的所有权授予nginx用户,将“用户名”替换为服务器用户的名称。
sudo chown nginx:nginx * -R
sudo usermod -a -G nginx username
第五步:配置Nginx
现在我们需要设置WordPress虚拟主机。尽管Wordpress在其安装上有一个额外的步骤,但是nginx网站为我们提供了一个简单的配置文件:
打开默认的nginx默认主机文件:
sudo vi /etc/nginx/conf.d/default.conf
配置应包括以下更改(更改的详细信息在配置信息下):
#
# The default server
#
server {
    listen       80;
    server_name  _;

    #charset koi8-r;

    #access_log  logs/host.access.log  main;

    location / {
        root   /var/www/wordpress;
        index index.php  index.html index.htm;
        if (-f $request_filename/index.html){
          rewrite (.*) $1/index.html break;
        }
        if (-f $request_filename/index.php){
          rewrite (.*) $1/index.php;
        }
        if (!-f $request_filename){
          rewrite (.*) /index.php;
        }
    }

    error_page  404              /404.html;
    location = /404.html {
        root   /usr/share/nginx/html;
    }

    # redirect server error pages to the static page /50x.html
    #
    error_page   500 502 503 504  /50x.html;
    location = /50x.html {
        root   /usr/share/nginx/html;
    }

    # proxy the PHP scripts to Apache listening on 127.0.0.1:80
    #
    #location ~ \.php$ {
    #    proxy_pass   http://127.0.0.1;
    #}

    # pass the PHP scripts to FastCGI server listening on 127.0.0.1:9000
    #
    location ~ \.php$ {
        root           /var/www/wordpress;
        fastcgi_pass   127.0.0.1:9000;
        fastcgi_index  index.php;
        fastcgi_param  SCRIPT_FILENAME  $document_root$fastcgi_script_name;
        include        fastcgi_params;
    }

    # deny access to .htaccess files, if Apache's document root
    # concurs with nginx's one
    #
    #location ~ /\.ht {
    #    deny  all;
    #}
}
上述配置:
- 在索引中添加index.php为首页
- 将根目录更改为/var/www/wordpress;
保存,退出并重新启动nginx以使更改生效:
sudo service nginx restart
第六步:访问wordpress并且进行安装
访问我们的ip地址或者绑定的域名:
打开首页应该如下图所示:
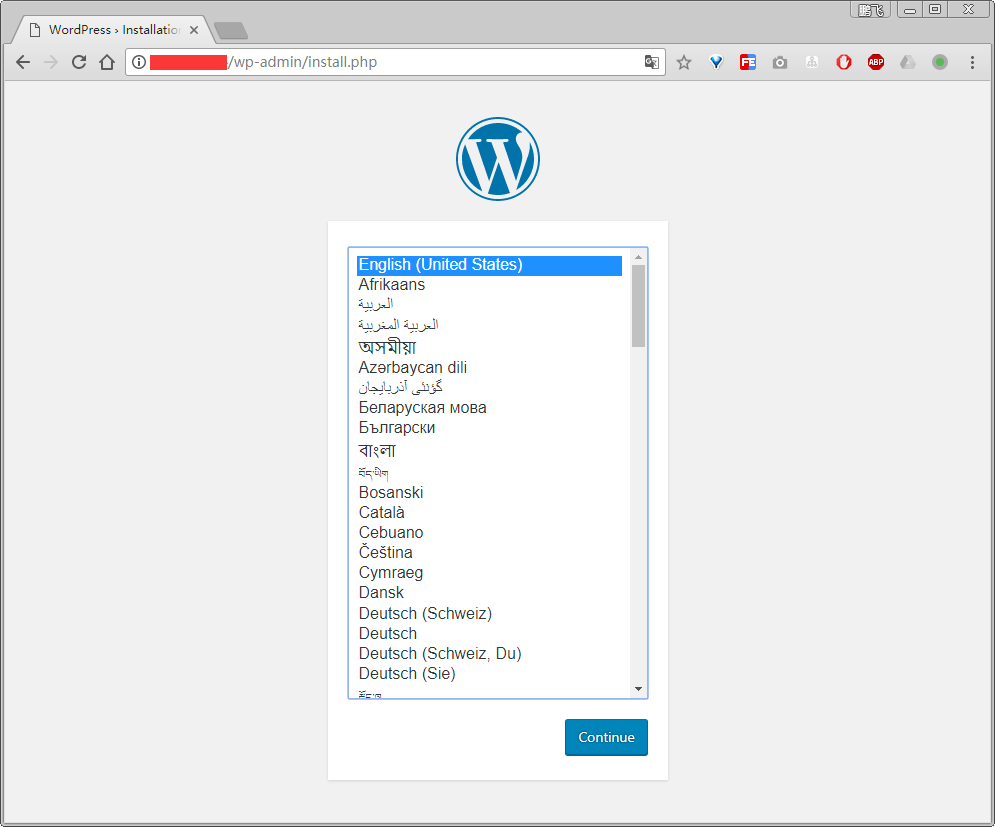
然后安装即可。
至此,
CentOS 6从零搭建wordpress(Linux+Nginx+Mysql+PHP)
完成。
参考:https://www.digitalocean.com/community/tutorials/how-to-install-wordpress-with-nginx-on-centos-6--2
文章的脚注信息由WordPress的wp-posturl插件自动生成

 微信扫一扫,打赏作者吧~
![[已解决]nc命令报错 close: Bad file descriptor](http://www.jyguagua.com/wp-content/themes/begin/timthumb.php?src=http://www.jyguagua.com/wp-content/uploads/2022/03/Snipaste_2022-03-18_20-16-48.png&w=280&h=210&zc=1)
![[已解决]SecureCRT/SSH 连接Linux缓慢](http://www.jyguagua.com/wp-content/themes/begin/timthumb.php?src=http://www.jyguagua.com/wp-content/uploads/2020/07/ssh_slow.jpg&w=280&h=210&zc=1)
![[转载]Linux的tickless设置](http://www.jyguagua.com/wp-content/themes/begin/timthumb.php?src=http://www.litrin.net/wp-content/uploads/2018/11/kernel_menuconfig_tickless-1.png&w=280&h=210&zc=1)
![[整理]鲲鹏性能优化十板斧(五)——应用程序性能调优<TaiShan特战队出品>](http://www.jyguagua.com/wp-content/themes/begin/timthumb.php?src=http://www.jyguagua.com/wp-content/uploads/2020/03/1-4.jpg&w=280&h=210&zc=1)
2017年12月15日 下午 2:07 沙发
谢谢你,非常详细的指导。